Showing posts with label recipe. Show all posts

Thursday, November 19, 2020

Be Thankful, Eat Pie


My husband's favorite holiday is almost here! 

Thanksgiving is always celebrated before any Christmas decor can be displayed - this year included. So many homes are decking the halls early this year because we all can use all the festive feels. We, too, are weary of the heavy load this world bears right now. We pray daily for relief and safety and peace. Not just next week on Thursday at dinner, but every day, we are thankful that we have each other and a home and meals on the table. That we are able to share what we have with those who might have a need or could use a helping hand. That we have the means and brains to follow CDC guidelines and our current DHMs to keep ourselves and others safe. That we are able to reach our extended family for virtual celebrations and games and stories and cooking together. That is something good that has come from this time.

Something good that comes from Thanksgiving at our house is pie! We keep a very traditional menu for Thanksgiving with the usual turkey, mashed potatoes, gravy, etcetera, and I always make three kinds of pie. Of course, we have pumpkin, a favorite of the grandchildren. Simple, flavored with quality pumpkin pie spice from Penzey's (it's easy on the nutmeg - yea!), then slathered with the whipped cream. Sometimes it's more like whipped cream with a bit of pumpkin pie. I shall not apologize for that, nor for teaching that to my grandchildren. It's once a year. We need something to look forward to.

Then there's pecan. I love pecan pie. The recipe I use is from the Centennial cookbook put out by the community association of our little village. It was submitted by a sweet elderly lady named Mercedes. Everyone called her Merc (Merse). Merc was kind and funny and generous. She lived alone in a little house a few blocks down the street. Whenever it snowed, my husband and his brother and father would clean sidewalks and driveways for those in town who couldn't do it themselves. A few days later, Merc would deliver a couple of pecan pies to their house as payment. This continued into Greg's and Randy's adulthood - they'd go clean Merc's sidewalks and driveway, then a couple of days later, she'd drop off a pie at their dad's house... Something we'd find out about a few days later...  😉

My husband was very happy when her recipe was in the cookbook, and it's the only one I've ever used to make pecan pie. I also use it for another offering in the pie category, and that's chocolate pecan pie. It's been several years now, but I remember hearing about or reading about CHOCOLATE pecan pie, and that just sounded so perfect. I did a little research and with just one tweak, was able to produce a new family favorite.

Let's make a chocolate pecan pie:
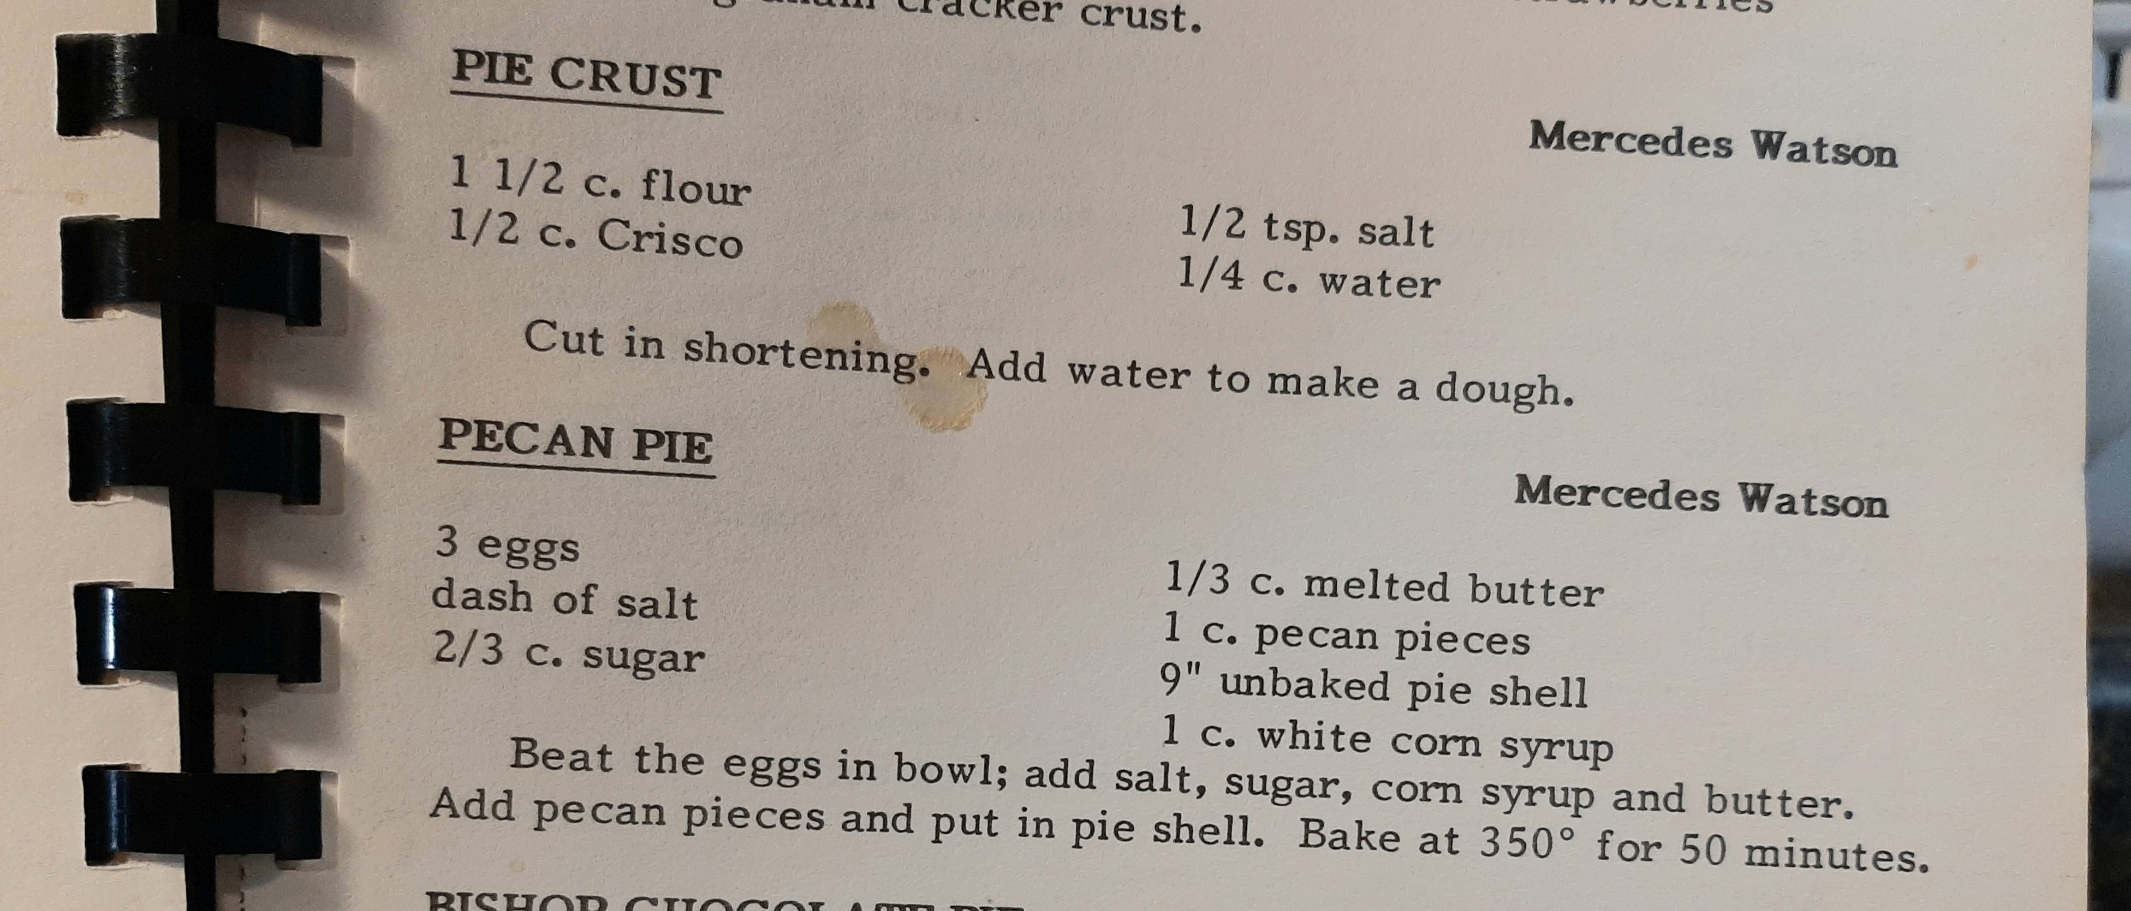
Here's the page of the cookbook with her recipe. You can see it's been well-used. First of all I melt the butter so it has a chance to cool a bit before adding it to the eggs. The one tweak to make it chocolate, is that I add about a quarter cup of chocolate chips to the butter, and melt them together. 

Then proceed with the recipe just as written. 


I use a deep dish 9" pie plate and that holds the batter perfectly. After 50-55 minutes in the oven, and our Precious is ready.

Let it cool completely before cutting. Serve with whipped cream or not. Enjoy for dessert and/or breakfast. Enjoy and be thankful. 


Our new pie server is actually a piece of vintage silver acquired from The Sassy Barn shop. Each one is hand-stamped, and are available in her shop for about a minute and a half each Sunday. Not even kidding. Her stuff sells out quick, but it's full of charm and vintage vibes.

Let's talk just a sec about the corn syrup. In case you're worried about it, here's an excerpt of an article I found

"According to an FAQ published by leading corn syrup manufacturer Karo, both the light and dark varieties of their product, which have been around for over 100 years, have never contained high-fructose corn syrup. At some point in the 1970s, HFCS was added to the reduced-calorie Karo Lite as well as to Karo Pancake Syrup. Due to consumer requests, the HFCS has now been removed from the Lite product, although it is still included in Karo Pancake Syrup."

Let us go forth into this next week and give thanks - wear a mask, celebrate virtually if that's the safest way for your family so you can all be together next year, and eat pie!

Wednesday, November 2, 2016

Soup Day

Even though it is now November, we're still having lovely weather here on the prairie. Every now and again there is a touch of chill to the air, though, and today the wind was from the north, and the sun was fleeting as the clouds blew in. It was a great day for soup for lunch!Usually when I'm home alone during the day I forage the refrigerator for leftovers and cobble together this and that to make something of a meal for lunch. Today I just kept thinking of a soup recipe I've made before in the Instant Pot. Since I had fresh-made beef stock (from t-bone steak bones and scraps), I quickly threw stuff in the IP, and within 20 minutes had a piping-hot bowl of nourishing and tasty vegetable beef soup.
The original recipe that I used for inspiration calls for potatoes and white rice, neither of which were in my pantry. Instead I used mushrooms and the last bit of a box of rotini pasta. I also substituted green beans for the peas, and black beans instead of garbanzo.This made a full pot of soup, so I enjoyed my lunch, then packaged up the remainder in glass jars to freeze for another meal. I love having extras to freeze for later.I'll be doing a couple of soup days for freezer cooking in the near future. It's an easy and frugal meal, and makes a perfect lunch for me and to send with Greg.Tell me what your favorite soup is - I'd love some ideas for new recipes to try!
Edited to add:It was so chaotic around here when I was trying to publish this post that I forgot to include the recipe. Oops! Here it is:

Pressure Cooker Vegetable Beef Soup

Yield: 6 servings
·      1lb. lean ground beef
·      1 tablespoon oil
·      1 large onion, diced
·      1 rib celery, chopped
·      6-8 mushrooms, quartered
·      3 cloves garlic, finely chopped or pressed
·      2 14-ounce cans beef broth (I used homemade)
·      1 14-ounce can crushed tomatoes
·      1 12-ounce bottle V8 juice
·      1 15-ounce can black beans, drained and rinsed
·      2 carrots, peeled then sliced into thin coins
·      1 can cut green beans, drained
·      salt and pepper
·       
1.  Preheat the pressure cooking pot using the browning or sauté setting. Add ground beef to the pressure cooking pot and cook until browned. Remove to a plate lined with paper towels.
2.  Add oil to the pressure cooking pot. Add onion, celery, and mushrooms. Cook, stirring occasionally, about 5 minutes. Add garlic and cook 1 minute more.
3.  Add beef broth, tomatoes, V8 juice, beans, carrots, and browned ground beef to the pot and stir to combine. Lock lid in place, select High Pressure and 4 minutes cook time. When timer beeps, turn off pressure cooker and do a quick pressure release.
4.  Stir in green beans and pasta, season with salt and pepper to taste. Turn on sauté function and cook until pasta is done to your liking.
(You could put the pasta in before pressure cooking since it only cooks 4 minutes, but I didn’t think to do that. It would save a little time at the end.)

Enjoy!

T.


Monday, February 29, 2016

Pizza Rolls for Lunch

Since my eldest grandson started school last Fall, we've packed his lunch most days. He is very easy going about what we pack for him, but I feel bad when he gets peanut butter and jelly sandwiches several days in a row because we need to get groceries. 
This morning I made up some pizza crust dough and used the last of a jar of pizza sauce from the frig to make these homemade pizza rolls.


I didn't take step-by-step pics, but it's simple. I divided the dough in two and then rolled each half into a rectangle. Shredded cheese was sprinkled all over each piece of dough. I mixed the pizza sauce with a pound of browned ground beef and divided that between the two pieces of dough, spreading it out evenly and trying to get it clear to the ends of the rectangle. Then roll it up on the long side and slice into rounds about an inch or a little more than that wide. 

They were placed on a baking sheet lined with a silicone mat, then I sprinkled a tiny bit of grated Parmesan cheese on top of each one and baked them at 400° for almost 25 minutes. 

It was my intention when I started these that I would use some turkey pepperoni left from the package they used to make pizzas for supper on Saturday, but there was no leftover pepperoni. Next time. The hamburger worked okay and didn't fall out of the rolls because I mixed it with the sauce before putting it on the dough. Obviously, any topping you like on a pizza could be used for these. We have some garlic cream sauce left from Saturday's pizza-thon, and I think I may make some more using that and some cooked mushrooms and onions. Yum!

These little things are pretty tasty on their own or dipped in some Ranch, which is how I ate two of them for my lunch. I put a couple in the cupboard for school lunch tomorrow, put a dozen in the freezer (in bags of two), and left several in a container on the counter for after-school snack today. 
You can just bake the roll without making slices, and the kids like that, too. I just don't think the center gets done enough without really drying out the outside. 

These aren't necessarily a quick think to make, if you factor in the one hour rise time for the dough, but they are easy. They'll be fine to eat at room temperature for school lunch, too. I'll thaw the frozen ones overnight in the frig, then by the time he's ready to eat them, they'll be perfect. 


Monday, August 24, 2015

Homemade Granola

After a few years of breakfast sandwiches and burritos from the local fine fast food eateries, Greg has started taking his morning meal with him from home. I flavor plain Greek yogurt with vanilla and honey, then pack a generous serving with a handful of fresh blueberries on top. As garnish, he sprinkles another generous helping of granola on top before enjoying his delicious nutritious breakfast. At first I purchased the granola -  Bear Naked brand because it’s pretty wholesome, and we like it. I bought two bags, thinking it would last through the month. No. Between Greg and Jess, it barely lasted a little over a week. Time to dig out the homemade granola recipe. The ingredients were in the cupboard already, and took less than 30 minutes to assemble, mix, and bake two quart jars full.

granola

The recipe came from an online friend of mine. Melanie blogs at Comfy House and posts lovely healthy, delicious-sounding recipes. I couldn’t find this exact recipe so I could link to it, which makes me wonder if it wasn’t posted in an email instead of on her blog. No matter, she did post a new granola concoction this summer that also would be wonderful. I chose to try the original one printed out quite some time ago and tucked away in my recipe notebook:

Homemade Granola

3 Cups Old-Fashioned Oats

¼ C vegetable oil

¼ C honey

¼ C brown sugar

1 tsp. vanilla

¼ tsp. cinnamon

½ tsp. salt

Preheat oven to 325°. Line baking sheet with parchment paper. Bake 20 minutes, stirring every 5 minutes. Let cool completely before stirring in 1 cup nuts and 1 cup dried fruits. Store in an airtight container.


signature_thumb[2]

Tuesday, March 11, 2014

Lunch from the Freezer

For the past sixteen years or so I’ve been doing some form of freezer cooking. By “freezer cooking” I mean putting either entire meals or the recipe-ready components for meals in the freezer to use at a later date. I’ve done the “cook all day and make whole meals” method, doubled recipes so we could eat one night and freeze the second for later, and just cooked meal or recipe ingredients to put together the night we eat. That could include browned ground beef, cooked chicken, cooked rice, homemade refried beans, cooked meatballs, homemade spaghetti sauce, etc. Freezer cooking was invaluable to me when I was working full time and the kids were in high school.

Even though Greg and I have been “empty-nesters” for a few years, I still do freezer cooking for us, as well as for lunches with the grandboys four days a week. Since I’m picking Brad up from preschool in town right at the time I should be cooking, I try to have it ready before we leave, then tuck it into the toaster oven to get or stay warm during the 45 minutes that trip takes. I like to feed them a hot lunch most days, and they are usually more than ready to eat by the time we get home, so having it ready to go makes the lunch hour much more enjoyable.

Today I pulled the components from the freezer for a delicious recipe of chicken and rice. I had cooked rice, cooked chicken, and homemade chicken stock to use. Then after making the recipe, I was able to put enough into the freezer for a second lunch for us in a few weeks.chicken rice

Here is the original recipe, with the changes I made in blue:

Cheesy Broccoli Rice Casserole Cups
Author/Source: Kim @ onceamonthmeals.com
Ingredients:
  • 1 cup brown rice (uncooked) (I had cooked brown rice already in the freezer, so used that and about 1/4 C homemade chicken broth)
  • 2 cups chicken broth
  • 2 cups broccoli, cut into florets  (yeah, I forgot about the broccoli – blame it on the time change! LOL)
  • 1 Tablespoon parsley flakes
  • 0.5 teaspoons garlic salt
  • 0.5 teaspoons onion powder
  • 0.25 teaspoons pepper
  • salt to taste
  • 1 cup shredded cheddar cheese (reserve 1/4 cup for topping)
  • 0.25 cups plain yogurt  (didn’t have any yogurt, so used light sour cream instead)
  • 2 Tablespoons whole milk
  • 2 medium eggs, beaten
  • 1 Cup cooked, chopped chicken
Directions:

Cook rice according to package directions, but substitute chicken broth for water. Meanwhile, steam broccoli until crisp tender in the microwave or over stovetop. (If you are using a rice cooker, you may be able to steam the broccoli with the rice.) Place rice and broccoli in a large mixing bowl and cool slightly. Stir in remaining ingredients reserving 1/4 of cheddar cheese for topping. Scoop into a greased or paper lined muffin tin. Sprinkle reserved cheese on top. Bake at 350 degrees for about 25 minutes until lightly browned and crisp. (I used a large-muffin tin, and there was a bit of mix leftover, so that went into a ramekin. It popped right out after cooling.)

Freezing Directions:

Cook as directed above. Cool casserole cups completely. Divide among freezer bags, label, and store. To serve: Thaw and reheat in microwave or toaster oven.

Servings: 4 (about 15 cups)


These were served with hot green beans and fresh Halo oranges. Yum. I like that the recipe did not include any “cream of…” soup at all. The yogurt (or sour cream in my case) and egg hold it all together, helped out by the melted cheese. Since my rice was pre-cooked and frozen, I added only a touch of chicken stock, which seemed to work just fine.


Supper tonight and part of lunch tomorrow will also be from the freezer. Even though I’m home all day, the boys keep me pretty busy, and freezer food makes sure we get a good homemade meal on the table.


signature

Wednesday, January 16, 2013

Banana Bread in a Zipper Bag

On Monday morning, just out of the blue, Bradley asked if we could make banana bread. I’d been sick all weekend and still wasn’t feeling well, so, much to his disappointment, I declined, but did promise to have everything ready to go on Wednesday (today) when he got here. When I made that promise, he and I got three old bananas out of the freezer and put them in a dish in the frig to thaw (freezer/pantry challenge!). By this morning, there were three more on the counter that were “banana bread worthy”, so I figured while I was making the effort, it was just as easy to bake up two loaves instead of one.

Usually I would just get out all the ingredients and measuring tools and let Brad help measure and combine it all. That’s great math practice. This time, though, since I’m still dragging from the influenza, I decided to have him mix the bread in a plastic zipper bag – less mess with fewer dishes, and he works those hands and finger muscles (think pre-handwriting), and gets to feel the textures of the ingredients while keeping his hands clean. That last one is pretty important to him. He will get his hands messy, but if he doesn’t have to, he’s happier. Anyway, I went ahead and measured the dry ingredients into the zipper bag, and measured the milk into a canning jar for him to use later. As I measured the ingredients for Brad’s bread, I did the same for that second loaf, only in a bowl. I got my loaf in the oven and baked and my bowl washed before the boys arrived. This worked out great, because we snacked on that loaf all day and Brad got to take his loaf home.

Anyway, as soon as 17 month-old Silas saw the step stool come out, he ran to the kitchen like his hair was on fire. He wanted to HELP. I was able to talk Brad into letting Silas have a quick turn to squish up the bananas in a separate small bag. He grabbed the tablespoon measure and beat that bag of bananas to a pulp. LOL. (This boy is tough to get a good photo of – he never stops moving!)

DSCN4082Silas tired of helping after he made sure the bananas were sufficiently battered, plus we gave him a big bowl and some spoons to play with in the other room while we worked.

First off I showed Brad the recipe in the cookbook. I asked him if he knew what a recipe is, and he answered, “It tells you what to do.” Yea! (Maybe I need a recipe book for cleaning up the playroom…)

Brad squished up the bag of dry ingredients, and when they were pretty well mixed, we moved on to the wet stuff in the canning jar. He helped crack the egg and held the spoon to measure the oil, then used a fork to mix those up. We talked about “dry”, and “wet” or “liquid” before combining the two. A little more squishing around with the bag and it was time to add the bananas. After it was all mixed together, I cut one bottom corner off the bag and we squeezed the batter into the baking dish.

DSCN4086 DSCN4089 DSCN4092 banana breadaaa

An hour later he was very happy with his final product! (And see the clean counter?)

The recipe is linked above if you’re interested. This is the one I’ve used for almost 32 years. The only change I made today was to use half white all-purpose and half white whole wheat flour. I used 3 bananas for each loaf, and did put chopped walnuts in the one I made myself.

There are lots of recipes that can be mixed by squishing things up in a zipper bag. When I was teaching preschool at Head Start, we made chocolate chip cookie dough in the bag, then cut the corner off the bottom and squeezed out pieces of dough for cookies. You can also make yeast bread in a bag – I just found that recipe online, and will post some links after we give it a try. I’d love to hear if you have a favorite “zipper bag” recipe!

A further note about the freezer/pantry challenge – I finally cooked from the frig/pantry last night for supper, making a toasted chicken, bacon, and cheese sub sandwich. Tonight we had chicken fried steaks from the freezer, along with the last bags of mashed potatoes and gravy leftover from the wedding. I also had some spaghetti squash I’d cooked and frozen into portions. Slowly but surely I’m getting back into the groove…


signature

Thursday, January 3, 2013

Pantry Challenge

Just a couple of days into the challenge and I’m already making a mental grocery list. LOL. Actually, I still need to do an inventory of the freezers and pantry, but won’t get to do that until the weekend since the grandboys are here a few days this week. Even though I don’t have the written inventory with which to write out some plans, I’ve still been pulling out the odd things to use up.

We really started this challenge on New Year’s Eve when Greg used some of the leftover Christmas prime rib to make us open-faced prime rib sandwiches for supper. He also took the last few crab legs, picked out all the meat, and made some delicious crab cakes to go along with the sandwiches. He doesn’t have a recipe for me to give you – it was a combination of a few recipes he found online. I like crab, but eating crab legs is a very labor-intensive process for a little meat, and it’s usually cold before you get much of it eaten. These crab cakes were a much more satisfying vehicle for me to enjoy that treat.

Yesterday I pulled this and that from the freezer and frig for lunch for the grandboys, then while Silas napped, Bradley and I made muffins for snack. We used up the last of a bag of frozen blueberries, and there were a few more than the recipe called for, so we got very fruity muffins! The recipe is a basic one from my old Better Homes and Gardens cookbook I got when we were first married (31+ years ago), and is a great way to use up tiny bits of fruit.

Blueberry Muffins

1 egg

½ cup milk

¼ cup oil

2 cups flour (we used half white whole wheat, half all-purpose)

1/3 cup sugar

3 teaspoons baking powder

1 teaspoon salt

1 cup blueberries (or fruit of your choice)

Preheat oven 375°F. Beat the egg, add oil and milk. Stir in dry ingredients all at once, then add blueberries. Bake 20-24 minutes, til golden brown. Makes about a dozen muffins.

Each boy ate two whole muffins for snack and Silas ended up with a purple leg after smearing a blueberry all around.

I guess that’s one way to use them up…


signature


Monday, November 26, 2012

Sweet Pumpkin Strudel

One more nod to Thanksgiving, then we’ll move on. We got to host the Noon meal on Thanksgiving Day, and then were guests at a second feast for Saturday supper. Our newly-married niece asked that I bring a dessert. Greg and I had seen this recipe for Sweet Pumpkin Strudel made on Michael Symon’s Cooking Channel show “Symon’s Suppers”. We both thought it looked delicious, and while staying in the flavor profile of Thanksgiving, it was a bit different from plain-old pumpkin pie.

These are easy to make, but a bit tedious. I suggest teamwork – someone butter, someone roll them up. I did these by myself, and they needed to be baked and cooled in time to leave for Sara’s, so I put together a dozen of them, then stashed the rest of the filling in the frig. I’ll make up some more and freeze them, then they can be baked whenever Greg wants a pumpkin-y  treat.

I’ll reprint the recipe here, but if you click on the link above, you’ll go to the official web site. You’ll notice the recipe yield says 12 servings, which is what I made, and I had a lot of filling leftover. I also chose to go without nuts, since there was a good chance that the baby grandson would eat them. We did have the turbinado sugar, though, and that’s a fun touch.

These were served just as you see in the photo, and were well-liked. I think with the honey and whipped cream they’d be even better.

Sweet Pumpkin Strudel

Yield: 12 servings

Ingredients

  • One 15-ounce can pumpkin DSCN3587
  • One 8-ounce package cream cheese, room temperature
  • 1/2 cup packed brown sugar
  • 1/2 teaspoon ground cinnamon
  • 1/2 teaspoon salt
  • 1/4 teaspoon ground ginger
  • 1/4 teaspoon ground nutmeg
  • 12 sheets frozen phyllo dough (18- by 14-inch rectangles), thawed
  • 2/3 cup butter, melted
  • 1 cup chopped pecans
  • 3 tablespoons turbinado sugar, or other coarse sugar
  • 2 tablespoons honey, for serving
  • Whipped cream, for serving, optional

Directions

Preheat the oven to 400 degrees F.
For the filling: Combine the pumpkin, cream cheese, brown sugar, cinnamon, salt, ginger and nutmeg in a small bowl. Mix until nearly uniform and set aside.
Place 2 sheets of the phyllo on top of one another and brush the top sheet with some of the butter. (Keep the remaining phyllo dough covered with plastic wrap to prevent it from becoming dry and brittle.)
Cut the 2 layered sheets of phyllo lengthwise to create 2 long strips. Place a well-rounded tablespoon of the filling about 2 inches from the end of the dough strip.
To shape, fold the bottom edge of the phyllo up and over the filling. Fold in the sides and roll up to encase the filling, brushing the exposed dry phyllo with some of the butter as you roll. Place the rolled phyllo on a baking sheet, seam-side-down. Brush the top of the phyllo with some of the butter. Repeat with the remaining ingredients. Sprinkle the tops of the phyllo with pecans and turbinado sugar. Bake until the phyllo is golden brown, about 15 minutes. Serve the phyllos warm drizzled with the honey and topped with whipped cream if using.